
How to Install a Wall Mount Range Hood
/Installing a wall mount range hood yourself is easier than many homeowners expect and can save hundreds or even thousands of dollars in labor. With the right tools, clear instructions, and a little preparation, you can enjoy improved air quality, a cleaner kitchen, and a professionally finished look without hiring an installer.

Range hoods have become a key upgrade in modern homes, not only for style, but for function as well. They remove smoke, grease, odors, airborne oils, and excess heat, improving both comfort and cleanliness. Depending on your model, the hood may vent outdoors through ducting or recirculate air through charcoal filters. This guide covers the installation process specifically for wall-mounted range hoods and may differ from the steps used for island or under-cabinet models.
Tools You Will Need
Power drill
Twist drill bits
Reciprocating saw
Angle grinder
Grinder blades
Screwdriver set
Caulking gun
Tape measure
Level
Materials You Will Need
Exterior vent hood
Foam insulation spray
Masking tape
Marker
Screws
Plastic flexible ducting (included with some models)
Wall plugs or anchors (optional, depending on wall type)
Safety glasses (recommended)
Twist ties (optional for excess cord management)
Choosing the Right Range Hood
When shopping for a range hood, focus on three core factors:
Size:
Your hood should match the width of your cooktop or extend slightly wider for optimal coverage.
Style:
Choose a finish that complements your kitchen, such as stainless steel, matte finishes, glass, wood accents, or copper-clad designs.
CFM (Airflow Strength):
As a general rule, choose a hood with a CFM rating roughly double the square footage of your kitchen. Higher CFM models are ideal for heavy cooking, searing, grilling, or using gas burners.
Begin Your Measurements
Start by measuring your ceiling height and determining whether you need a chimney extension or a short kit. Most wall mount range hoods perform best when installed 30–36 inches above the cooktop, depending on manufacturer recommendations.
Use masking tape to outline the range hood placement visually on the wall. This step helps confirm centering and spacing before drilling.

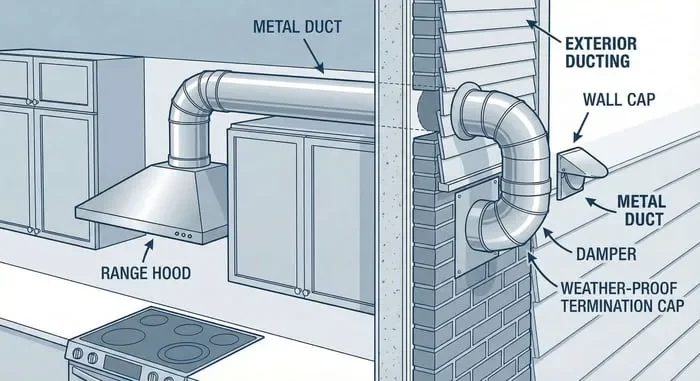
Installing Your Exterior Vent Hood
Before cutting, confirm that no electrical wiring, plumbing lines, or structural beams run behind the wall. If unsure, consult a contractor or electrician before proceeding.
Begin by tracing the diameter of the vent tubing on the interior wall using a marker. Drill small pilot holes along the traced outline until daylight becomes visible. These holes will guide your exterior cut and ensure accuracy on both sides of the wall.
Wearing safety glasses, use a reciprocating saw to cut a full circle from the exterior wall. Test-fit the vent tubing. If it extends too far or not far enough into the kitchen, adjust the length accordingly:
Too long: Measure and trim using an angle grinder.
Too short: Add a compatible extension and secure with sheet-metal screws and HVAC tape.
Once the tubing fits properly, secure the exterior vent with screws and seal around the perimeter with caulk to prevent leaks, drafts, and moisture exposure.
Pro Tip: Choose an exterior vent with a backdraft damper to prevent cold air, insects, and debris from entering your home.
Installing Your Range Hood
With the duct path ready, begin mounting the hood body. Mark the mounting screw positions using the template or measurements provided with your range hood, ensuring they are centered above your range and properly aligned with the ducting.
Insert wall plugs or anchors and gently tap them flush. Install the mounting screws partially, leaving room to hook the hood into position. Hang the hood onto the screws and use a level to adjust alignment. Once perfectly positioned, tighten the screws securely.
For safety and ease, having a second person assist during mounting is recommended.
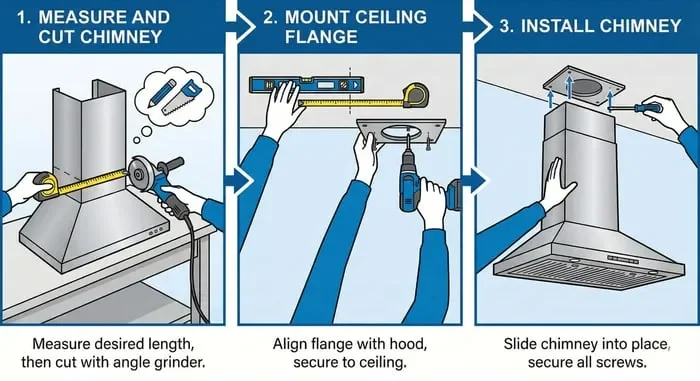
Installing Your Ducting and Chimney
Apply foam insulation spray around the tubing from the exterior vent to seal gaps and improve energy efficiency. Attach the flexible ducting to the hood outlet and the exterior vent tube, trimming if needed with a box cutter. Secure all connections tightly using clamps or HVAC duct tape.
Before installing the chimney, plug in the hood and test the fan to ensure proper airflow. Once airflow is confirmed, measure the space between the hood and ceiling to determine if chimney trimming is needed. Use an angle grinder for clean cuts if adjustments are necessary.
Attach the mounting flange to the ceiling and slide the chimney into place, fastening securely once aligned.
At this point, your wall mount range hood installation is complete and ready for everyday use.